
flutter&firebase でWEBサービス ハッシュタグをchipsで実装
ハッシュタグの実装方法
flutterではChipsでハッシュタグの実装を行います。
以下のサイトを参考にさせて頂きました。
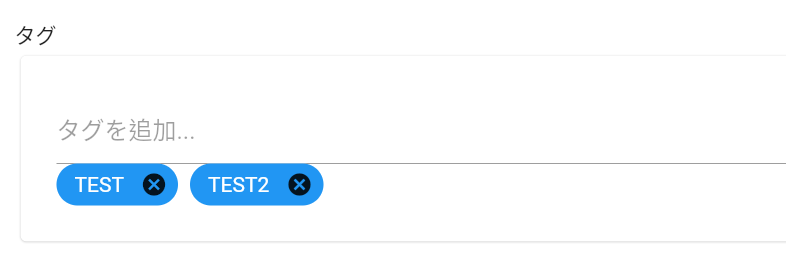
完成イメージ
作成したハッシュタグの実装画面です。
完成後の動作です。
ソースコード
上記の完成イメージになるWidgetです。child要素にtagChipsを設定しています。
Card(
    color: Colors.white,
    child: Padding(
      padding: EdgeInsets.all(8.0),
      child: tagChips,
    )),
tagChips
完成したハッシュタグ用のwidgetです。StatelessWidgetで作成しています。
import 'package:flutter/material.dart';
import 'package:flutter/rendering.dart';
import 'package:provider/provider.dart';
import 'package:stockcodes/model/codeModel.dart';

class TagChips extends StatelessWidget {
  late FocusNode _textFieldFocusNode;
  late TextEditingController _inputController;
  late List<String> _tagStrings;
  List<Chip> _chipList = [];
  int _keyNumber = 0;
  late bool _editflag;
  bool _firstBuild = true;

  TagChips(List<String>? tagStrings, bool editflag) {
    this._tagStrings = tagStrings!;
    this._editflag = editflag;
    this._textFieldFocusNode = FocusNode();
    this._inputController = TextEditingController();
    _inputController.text = '';
  }

  List<String> get tags {
    _tagStrings = [];
    _chipList.forEach((chip) {
      Text text = chip.label as Text;
      _tagStrings.add(text.data!);
    });
    return _tagStrings;
  }

  Key _getKey() {
    Key chipKey = Key('chip_key_$_keyNumber');
    _keyNumber++;
    return chipKey;
  }

  @override
  Widget build(BuildContext context) {
    final CodeModel codeModel = Provider.of<CodeModel>(context);

    //初回だけ実行
    if (_firstBuild) {
      this._tagStrings.forEach((tagstring) {
        Key keystr = _getKey();
        _chipList.add(Chip(
          key: keystr,
          backgroundColor: Colors.blue,
          labelStyle: TextStyle(
            color: Colors.white,
          ),
          label: Text(tagstring),
          onDeleted: () {
            if (_editflag) {
              _chipList.removeWhere((Widget w) => w.key == keystr);
              codeModel.update();
            }
          },
        ));
      });
      _firstBuild = false;
    }

    return Container(
      padding: EdgeInsets.all(16.0),
      child: Column(
        mainAxisAlignment: MainAxisAlignment.start,
        children: <Widget>[
          TextField(
            focusNode: _textFieldFocusNode,
            enabled: _editflag,
            controller: _inputController,
            decoration: InputDecoration(
              hintText: 'タグを追加...',
            ),
            onSubmitted: (String text) {
              _inputController.text = '';
              Key keystr = _getKey();
              _chipList.add(
                Chip(
                  key: keystr,
                  label: Text(text),
                  backgroundColor: Colors.blue,
                  labelStyle: TextStyle(
                    color: Colors.white,
                  ),
                  onDeleted: () {
                    _chipList.removeWhere((Widget w) => w.key == keystr);
                    codeModel.update();
                  },
                ),
              );
              FocusScope.of(context).requestFocus(_textFieldFocusNode);
              codeModel.update();
            },
          ),
          Row(
            mainAxisAlignment: MainAxisAlignment.start,
            crossAxisAlignment: CrossAxisAlignment.start,
            children: <Widget>[
              Expanded(
                child: Wrap(
                  alignment: WrapAlignment.start,
                  spacing: 8.0,
                  runSpacing: 0.0,
                  direction: Axis.horizontal,
                  children: _chipList,
                ),
              ),
            ],
          ),
        ],
      ),
    );
  }
}
ハマったところ
初回だけ初期値設定
statelessで作ったためか、画面の再描画によりchipsのデータが消えたりする挙動が発生しました。そのため初回だけ値を設定する処理を追加しています。
    //初回だけ実行
    if (_firstBuild) {
      this._tagStrings.forEach((tagstring) {
        Key keystr = _getKey();
        _chipList.add(Chip(
          key: keystr,
          backgroundColor: Colors.blue,
          labelStyle: TextStyle(
            color: Colors.white,
          ),
          label: Text(tagstring),
          onDeleted: () {
            if (_editflag) {
              _chipList.removeWhere((Widget w) => w.key == keystr);
              codeModel.update();
            }
          },
        ));
      });
      _firstBuild = false;
    }
値を返すための関数
chipsに設定した値を最後にリストで返却するのですが、どうやってchipsから値を取得してよいか分からずはまりました。以下のやり方でうまくいっています。
  List<String> get tags {
    _tagStrings = [];
    _chipList.forEach((chip) {
      Text text = chip.label as Text;
      _tagStrings.add(text.data!);
    });
    return _tagStrings;
  }