
python3+bottleで作成したDockerコンテナをherokuへデプロイ(windows10のWSL環境)
目的
アプリケーション開発では、多くのライブラリやパッケージを利用する。
その際、並行開発しているアプリケーションに影響がでないよう、仮想的な作業スペースを準備する
しかし、言語ごとに仮想ディレクトリを操作する手順を覚えねばならず(pythonならvenv,rubyならrbenv)、学習コストがかかる。
また、ツールのトレンドの移り変わりもあるので、状況によっては学びなおす必要がある。これを言語ごとにやるのは大変。
そこで、Dockerを導入して、仮想環境の準備手順を一元的に行えるようにしたい。
今回は、Python3でbottleフレームワークを利用したWebアプリケーションを作成し、Herokuへデプロイするまでを行う。
前提条件
- 環境は、Windows10 WSL(Ubuntu 18.04)
- Dockerはインストール済み
- Herokuのアカウントは作成済み
大まかな作業の流れ
以下の表に、大まかな作業の流れを以下の表に記載する。
作業の工程は、開発→初回デプロイ→修正→再デプロイの流れで進む。
それぞれの作業は、コマンドライン(ubuntuではbash)で実行することになる。
| # | 行程 | 作業 | コマンド | 説明 | 備考 |
| 1 | ①開発 | アプリ開発 | Dockerfile作成 {app.py}作成 git add/commit ※ |
デプロイ用 アプリ本体 バージョン管理 |
※gitは必須ではない |
| 2 | アプリ動作確認 | docker build -t bottlescrapy . docker run -d -p 8080:8080 {bottlescrapy} |
コンテナ作成 コンテナ実行 |
※herokuを使う場合は、portを環境変数から取得するようにapp.pyを変更(後述) | |
| 3 | ②初回デプロイ | Heroku準備 | heroku login heroku container:login |
herokuへログイン | heroku cliが必要 |
| 4 | アプリ登録 | heroku create | herokuにアプリを登録 | – | |
| 5 | アドオン追加 | heroku addons:create | – | 今回は利用しなかったので、記載なし。もしDBを利用したりする場合は必要 | |
| 6 | デプロイ準備 | heroku container:push web | herokuへコンテナをプッシュする。 | 初回は時間がかかる | |
| 7 | リリース | heroku container:release web | リリースの実行 | – | |
| 8 | 起動確認 | heroku open heroku logs |
実際に画面を確認 ログを確認 |
– | |
| 9 | ③アプリ修正 | ソース修正 | {app.py}作成 git add/commit ※ |
ソースを修正 | ※gitは必須ではない |
| 10 | コンテナ再作成 | docker build -t bottlescrapy . | コンテナを作り直す | – | |
| 11 | 実行中コンテナ停止 | docker ps -s docker stop 46447b74f825 |
コンテナの再実行のために、ローカルで実行中のコンテナを停止 | – | |
| 12 | コンテナ再実行 | docker run -d -p 8080:8080 bottlescrapy | コンテナ再実行 | – | |
| 13 | ④デプロイ | 再デプロイ準備 | heroku container:push web | herokuへコンテナをプッシュする。 | – |
| 14 | 再リリース | heroku container:release web | リリースの実行 | – | |
| 15 | 起動確認 | heroku open heroku logs |
実際に画面を確認 ログを確認 |
– |
参考URL
- Docker on Heroku のはじめ方
- Docker上でPython3+軽量フレームワークbottleを動かす
- Container Registry & Runtime (Docker Deploys)
開発作業
先ほどの工程に沿って、作業の詳細を記載する。
①開発
開発の流れを説明します。
アプリ開発
1、Dockerfileの作成
まずはUbuntuのターミナルを立ち上げ、作業ディレクトリへ移動し、Dockerfileを作成する。

Dockerfileファイルの中身は以下の通り
# Pythonは公式イメージ
FROM python:3.6

MAINTAINER ******* ******* <*******.*******@gmail.com>

WORKDIR /app

# bottleをインストール
RUN pip install bottle

COPY app.py /app

CMD ["python3", "app.py"]
2、app.pyの作成
次に、アプリケーションの本体となるapp.pyを作成する。ソースは以下の通り。
【!!注意!!】
以下のソースはHerokuに上げた際に、PORTを環境変数から取得していないため起動されません。
その修正については、ソースの修正と再デプロイ手順で行う予定ですが、
不要な方は、修正済みのソース(後述)を使ってください。
from bottle import route, run

@route('/')
def hello():
        return "Hello World!!!!!!!\n"

run(host='0.0.0.0',port=8080)
アプリ動作確認
Dockerコマンドを利用して、コンテナを作成します。このとき、最後の「.」を忘れると「”docker build” requires exactly 1 argument」と怒られるので注意です。
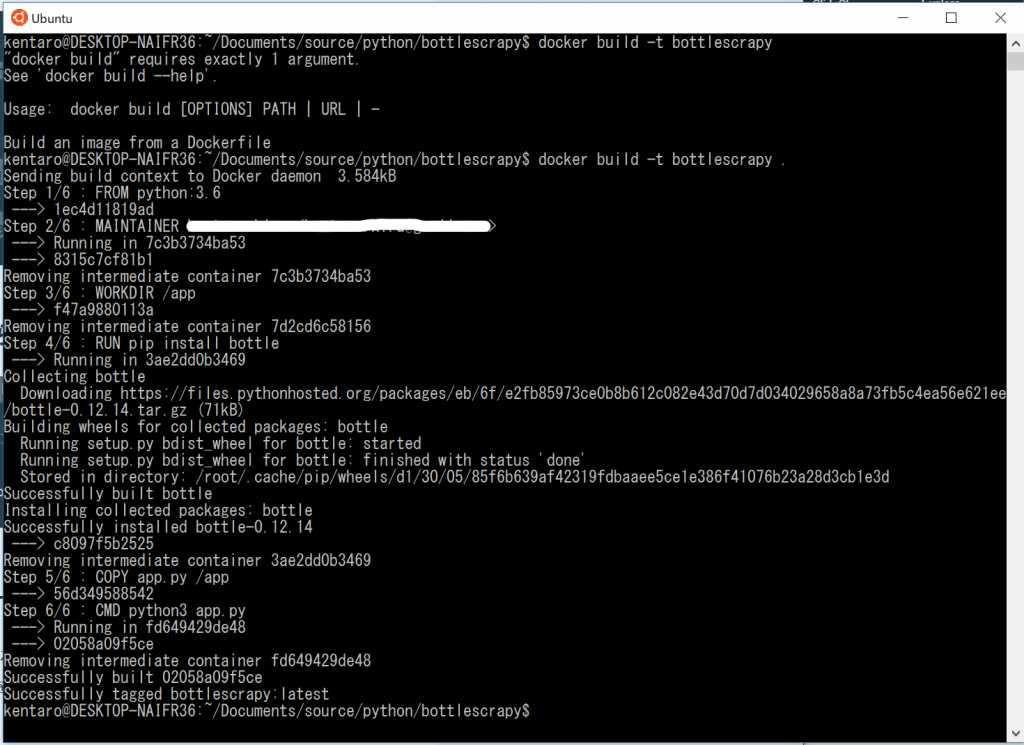
コンテナが作成出来たら、Dockerで起動します。
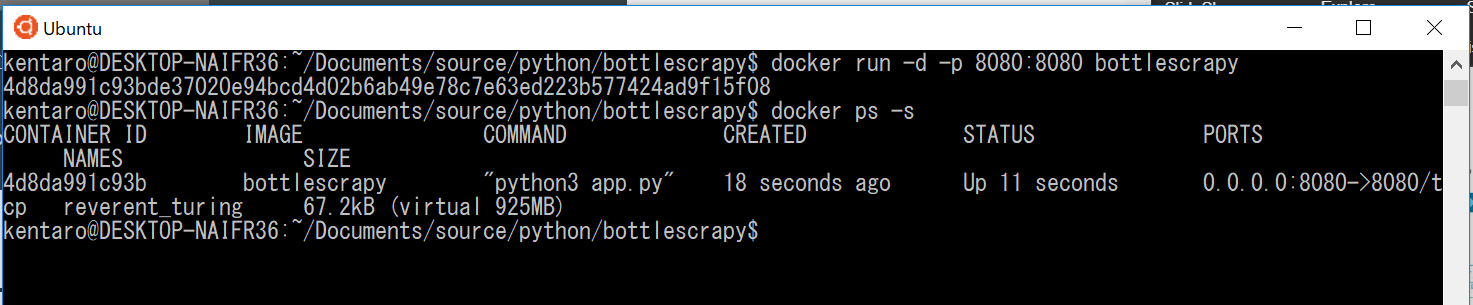
正常に起動できているかは、「docker ps -s」で確認できます。
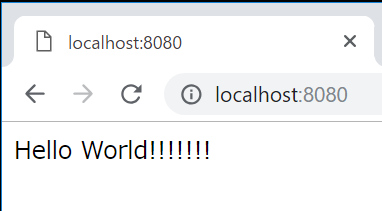
プロセスが正常に起動できていれば、ブラウザから設定したポートにアクセスすると、Hello Worldが返ってきます。
②初回デプロイ
初回デプロイの手順について説明します。
Heroku準備
これまでで作成したソースを、念のためgitへコミットしておきます。(必須ではないです)

ここから、herokuへデプロイするための準備を行っていきます。
もし、heroku cli がまだインストールされていなければ、以下のコマンドを実行してインストールを実行
$ wget -qO- https://cli-assets.heroku.com/install-ubuntu.sh | sh
This script requires superuser access to install apt packages.
You will be prompted for your password by sudo.
[sudo] password for *******:
+ dpkg -s apt-transport-https
+ echo
+ apt-get update
Get:1 http://security.ubuntu.com/ubuntu bionic-security InRelease [83.2 kB]
Hit:2 http://archive.ubuntu.com/ubuntu bionic InRelease
Get:3 http://archive.ubuntu.com/ubuntu bionic-updates InRelease [88.7 kB]
Get:4 http://archive.ubuntu.com/ubuntu bionic-backports InRelease [74.6 kB]
Get:5 http://archive.ubuntu.com/ubuntu bionic-updates/main amd64 Packages [444 kB]
Get:6 http://archive.ubuntu.com/ubuntu bionic-updates/universe amd64 Packages [581 kB]
Fetched 1271 kB in 7s (170 kB/s)
Reading package lists... Done
+ apt-get install -y apt-transport-https
Reading package lists... Done
Building dependency tree
Reading state information... Done
The following packages were automatically installed and are no longer required:
  bridge-utils pigz ubuntu-fan
Use 'sudo apt autoremove' to remove them.
The following NEW packages will be installed:
  apt-transport-https
0 upgraded, 1 newly installed, 0 to remove and 5 not upgraded.
Need to get 1692 B of archives.
After this operation, 152 kB of additional disk space will be used.
Get:1 http://archive.ubuntu.com/ubuntu bionic-updates/universe amd64 apt-transport-https all 1.6.6 [1692 B]
Fetched 1692 B in 1s (3137 B/s)
Selecting previously unselected package apt-transport-https.
(Reading database ... 101001 files and directories currently installed.)
Preparing to unpack .../apt-transport-https_1.6.6_all.deb ...
Unpacking apt-transport-https (1.6.6) ...
Setting up apt-transport-https (1.6.6) ...
+ echo deb https://cli-assets.heroku.com/apt ./
+ dpkg -s heroku-toolbelt
+ true
+ curl https://cli-assets.heroku.com/apt/release.key
+ apt-key add -
  % Total    % Received % Xferd  Average Speed   Time    Time     Time  Current
                                 Dload  Upload   Total   Spent    Left  Speed
100  1737  100  1737    0     0   5139      0 --:--:-- --:--:-- --:--:--  5139
OK
+ apt-get update
Get:1 https://cli-assets.heroku.com/apt ./ InRelease [2533 B]
Hit:2 http://security.ubuntu.com/ubuntu bionic-security InRelease
Hit:3 http://archive.ubuntu.com/ubuntu bionic InRelease
Hit:4 http://archive.ubuntu.com/ubuntu bionic-updates InRelease
Hit:6 http://archive.ubuntu.com/ubuntu bionic-backports InRelease
Get:5 https://cli-assets.heroku.com/apt ./ Packages [616 B]
Fetched 3149 B in 3s (1079 B/s)
Reading package lists... Done
+ apt-get install -y heroku
Reading package lists... Done
Building dependency tree
Reading state information... Done
The following packages were automatically installed and are no longer required:
  bridge-utils pigz ubuntu-fan
Use 'sudo apt autoremove' to remove them.
The following NEW packages will be installed:
  heroku
0 upgraded, 1 newly installed, 0 to remove and 5 not upgraded.
Need to get 16.3 MB of archives.
After this operation, 0 B of additional disk space will be used.
Get:1 https://cli-assets.heroku.com/apt ./ heroku 7.18.10-1 [16.3 MB]
Fetched 16.3 MB in 3s (4930 kB/s)
Selecting previously unselected package heroku.
(Reading database ... 101005 files and directories currently installed.)
Preparing to unpack .../heroku_7.18.10-1_amd64.deb ...
Unpacking heroku (7.18.10-1) ...
Setting up heroku (7.18.10-1) ...
heroku installed to /usr/bin/heroku
heroku/7.18.10 linux-x64 node-v11.1.0
$ sudo heroku login
[sudo] password for *******:
Sorry, try again.
[sudo] password for *******:
heroku: Press any key to open up the browser to login or q to exit:
 ›   Warning: If browser does not open, visit
 ›   https://cli-auth.heroku.com/auth/browser/9f26c3b6-714a-43b6-b094-d180cb3514f6
Warning: spawn cmd.exe ENOENT
 ›   Warning: Cannot open browser. Go to https://cli-auth.heroku.com/auth/browser/9f26c3b6-714a-43b6-b094-d180cb3514f6
 ›   to finish login or run heroku login --interactive
 ›
heroku: Waiting for login... ⡿
ブラウザからログインを実行
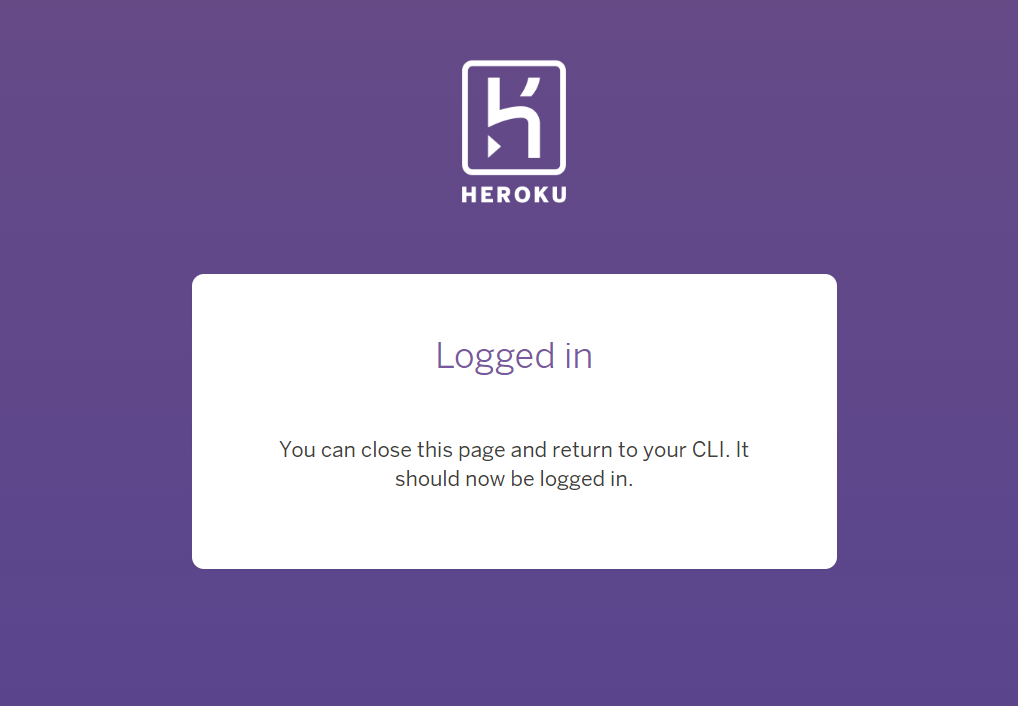
ターミナルをにもどると、下記の通り「logging in … done」が表示され、ログインが成功しています。
$ sudo heroku login
heroku: Press any key to open up the browser to login or q to exit:
 ›   Warning: If browser does not open, visit
 ›   https://cli-auth.heroku.com/auth/browser/9f26c3b6-714a-43b6-b094-******
Warning: spawn cmd.exe ENOENT
 ›   Warning: Cannot open browser. Go to https://cli-auth.heroku.com/auth/browser/9f26c3b6-714a-43b6-b094-******
 ›   to finish login or run heroku login --interactive
 ›
Logging in... done
Logged in as *********@gmail.com
アプリ登録
heroku上にアプリケーションを作成します。
$ sudo heroku create bottlescrapy
Creating ⬢ bottlescrapy... done
https://bottlescrapy.herokuapp.com/ | https://git.heroku.com/bottlescrapy.git
$
このとき、まだ、アプリをプッシュしてないので、アクセスしてもデフォルトの画面が出るだけ

デプロイ準備
herokuのコンテナーにログインします。
$ sudo heroku container:login
Login Succeeded
ローカルで作成したコンテナを、herokuへアップロードします。
sudo heroku container:push web
=== Building web (/home/*******/Documents/source/python/bottlescrapy/Dockerfile)
Sending build context to Docker daemon  52.74kB
Step 1/6 : FROM python:3.6
 ---> 1ec4d11819ad
Step 2/6 : MAINTAINER ******* ******* <*******.*******@gmail.com>
 ---> Using cache
 ---> 8315c7cf81b1
Step 3/6 : WORKDIR /app
 ---> Using cache
 ---> f47a9880113a
Step 4/6 : RUN pip install bottle
 ---> Using cache
 ---> c8097f5b2525
Step 5/6 : COPY app.py /app
 ---> Using cache
 ---> 56d349588542
Step 6/6 : CMD python3 app.py
 ---> Using cache
 ---> 02058a09f5ce
Successfully built 02058a09f5ce
Successfully tagged registry.heroku.com/bottlescrapy/web:latest
=== Pushing web (/home/*******/Documents/source/python/bottlescrapy/Dockerfile)
The push refers to a repository [registry.heroku.com/bottlescrapy/web]
5f2715d89a6a: Pushed
b28bb0e035ec: Pushed
f7c51fdee3d3: Pushed
27951393f8e7: Pushed
f89067d6e30e: Pushed
5129f19da2c9: Pushed
34929ec591c4: Pushed
e02b32b1ff99: Pushed
f75e64f96dbc: Pushed
8f7ee6d76fd9: Pushed
c23711a84ad4: Pushed
90d1009ce6fe: Pushed
latest: digest: sha256:1f41058a199b1feda297719ef69c510fe073eb34d00037043e458bdff****** size: 2842
Your image has been successfully pushed. You can now release it with the 'container:release' command.
リリース
herokuへのコンテナのプッシュに成功したので、リリースを実行します。
$ sudo heroku container:release web
Releasing images web to bottlescrapy... done
起動確認
heroku opneでwebアプリケーションを開いてもエラーとなっているバズです。
ここまで、herokuの制約対応は一切していないので、エラー個所を特定するために、
heroku logsを確認し、発生している不具合個所に対して対応を行ないます。
 sudo heroku logs
2018-12-02T02:29:59.568491+00:00 app[api]: Enable Logplex by user *******@gmail.com
2018-12-02T02:29:59.494039+00:00 app[api]: Initial release by user *******@gmail.com
2018-12-02T02:29:59.494039+00:00 app[api]: Release v1 created by user *******@gmail.com
2018-12-02T02:34:03.140868+00:00 heroku[router]: at=info code=H81 desc="Blank app" method=GET path="/" host=bottlescrapy.herokuapp.com request_id=7b5c094d-c4b7-4f69-bf8f-c425fabded84 fwd="***.***.***.99" dyno= connect= service= status=502 bytes= protocol=https
2018-12-02T02:48:26.909709+00:00 heroku[router]: at=info code=H81 desc="Blank app" method=GET path="/favicon.ico" host=bottlescrapy.herokuapp.com request_id=86969ba0-f15d-4e7d-ab32-561e76264899 fwd="***.***.***.99" dyno= connect= service= status=502 bytes= protocol=https
2018-12-02T02:48:30.045646+00:00 heroku[router]: at=info code=H81 desc="Blank app" method=GET path="/" host=bottlescrapy.herokuapp.com request_id=24f7db4a-f6e3-4cca-a4e8-75a9902cea4b fwd="***.***.***.99" dyno= connect= service= status=502 bytes= protocol=https
2018-12-02T02:48:30.334609+00:00 heroku[router]: at=info code=H81 desc="Blank app" method=GET path="/favicon.ico" host=bottlescrapy.herokuapp.com request_id=9c3c7349-afc2-4729-8f03-a559146bbb7f fwd="***.***.***.99" dyno= connect= service= status=502 bytes= protocol=https
2018-12-02T02:50:20.420765+00:00 app[api]: Deployed web (02058a09f5ce) by user *******@gmail.com
2018-12-02T02:50:20.420765+00:00 app[api]: Release v3 created by user *******@gmail.com
2018-12-02T02:50:35.479892+00:00 heroku[web.1]: Starting process with command `python3 app.py`
2018-12-02T02:51:35.745306+00:00 heroku[web.1]: Error R10 (Boot timeout) -> Web process failed to bind to $PORT within 60 seconds of launch
2018-12-02T02:51:35.745306+00:00 heroku[web.1]: Stopping process with SIGKILL
2018-12-02T02:51:35.835961+00:00 heroku[web.1]: State changed from starting to crashed
2018-12-02T02:51:35.838125+00:00 heroku[web.1]: State changed from crashed to starting
2018-12-02T02:51:35.817148+00:00 heroku[web.1]: Process exited with status 137
2018-12-02T02:51:41.600563+00:00 heroku[router]: at=error code=H20 desc="App boot timeout" method=GET path="/" host=bottlescrapy.herokuapp.com request_id=677b6bbd-dd61-4354-96b4-36cd8adffc84 fwd="***.***.***.99" dyno= connect= service= status=503 bytes= protocol=https
2018-12-02T02:51:57.535040+00:00 heroku[web.1]: Starting process with command `python3 app.py`
2018-12-02T02:52:57.844468+00:00 heroku[web.1]: Error R10 (Boot timeout) -> Web process failed to bind to $PORT within 60 seconds of launch
2018-12-02T02:52:57.844604+00:00 heroku[web.1]: Stopping process with SIGKILL
2018-12-02T02:52:57.931068+00:00 heroku[web.1]: Process exited with status 137
2018-12-02T02:52:57.953057+00:00 heroku[web.1]: State changed from starting to crashed
2018-12-02T02:53:00.302643+00:00 heroku[router]: at=error code=H10 desc="App crashed" method=GET path="/" host=bottlescrapy.herokuapp.com request_id=1078009f-fef3-4a6d-966f-82dd67042b6b fwd="***.***.***.99" dyno= connect= service= status=503 bytes= protocol=https
2018-12-02T02:53:01.448247+00:00 heroku[router]: at=error code=H10 desc="App crashed" method=GET path="/favicon.ico" host=bottlescrapy.herokuapp.com request_id=1b215c55-856d-4f62-8208-4dc839f4eb6d fwd="***.***.***.99" dyno= connect= service= status=503 bytes= protocol=https
上記より、原因個所は「 Error R10 (Boot timeout) -> Web process failed to bind to $PORT within 60 seconds of launch」のようです。
アプリ修正
アプリ修正の手順について説明します。
ソース修正
herokuは環境変数 PORT で指定されたポートで LISTENしていないとアプリをクラッシュさせて停止します。
なので、ポート番号をべた書きにしていた個所をなおします。
また再起動時に、修正が反映されたか分かりやすいように、hello worldの!の数をかえました。
- import osを追記
- run(host=’0.0.0.0′,port=int(os.environ.get(“PORT”, 8080)))に変更
import os
from bottle import route, run

@route('/')
def hello():
        return "Hello World!!\n"

run(host='0.0.0.0',port=int(os.environ.get("PORT", 8080)))
# run(host='0.0.0.0',port=8080)
コンテナ再作成/コンテナ停止/再実行
ソースを書き換えたので、コンテナを作り直します。手順は以下の通りです。この時、すでに起動済みのコンテナを停止するために、コンテナIDが必要となりますので「docker ps -s」でコンテナIDを確認します。確認したコンテナIDを使用して「docker stop」を行います。
その後、作成しなおしたコンテナを「docker run」で実行します。
- sudo docker build -t bottlescrapy .
- sudo docker ps -s
- sudo docker stop 46447b74f825
- sudo docker run -d -p 8080:8080 bottlescrapy
コンテナ再作成
$ sudo docker build -t bottlescrapy .
Sending build context to Docker daemon  52.74kB
Step 1/6 : FROM python:3.6
 ---> 1ec4d11819ad
Step 2/6 : MAINTAINER ******* ******* <*******.*******@gmail.com>
 ---> Using cache
 ---> 8315c7cf81b1
Step 3/6 : WORKDIR /app
 ---> Using cache
 ---> f47a9880113a
Step 4/6 : RUN pip install bottle
 ---> Using cache
 ---> c8097f5b2525
Step 5/6 : COPY app.py /app
 ---> d7d4dc91beb4
Step 6/6 : CMD python3 app.py
 ---> Running in c7ec50db2b36
 ---> 0bdadfdfacd3
Removing intermediate container c7ec50db2b36
Successfully built 0bdadfdfacd3
Successfully tagged bottlescrapy:latest
実行中コンテナ停止
$ sudo docker ps -s
CONTAINER ID        IMAGE               COMMAND             CREATED             STATUS              PORTS                    NAMES               SIZE
46447b74f825        7593de5e6690        "python3 app.py"    8 minutes ago       Up 8 minutes        0.0.0.0:8080->8080/tcp   suspicious_pare     67.2kB (virtual 925MB)

$ sudo docker stop 46447b74f825
46447b74f825

$ sudo docker ps -s
CONTAINER ID        IMAGE               COMMAND             CREATED             STATUS              PORTS               NAMES               SIZE
コンテナ再実行
$ sudo docker run -d -p 8080:8080 bottlescrapy
f2a580cfe945c38c41109e27272b2f24fe4b3e1cc1f5e13da084749f3d1d15a2

$ sudo docker ps -s
CONTAINER ID        IMAGE               COMMAND             CREATED             STATUS              PORTS                    NAMES               SIZE
f2a580cfe945        bottlescrapy        "python3 app.py"    9 seconds ago       Up 2 seconds        0.0.0.0:8080->8080/tcp   goofy_minsky        67.2kB (virtual 925MB)
コンテナが正常に起動出来たら、画面で確認します。
!!マークの数が変わっているので、変更が正しく反映できているようです。

デプロイ
herokuへのデプロイをリトライします。
再デプロイ準備
既にコンテナーは作成しているので、gitへのコミットはあまり影響ないですが、
ここまでの修正をcommitしておきます。
$ git add .
$ git commit -m "mod port"
herokuへ修正したコンテナをデプロイします。
sudo heroku container:push web
=== Building web (/home/*******/Documents/source/python/bottlescrapy/Dockerfile)
Sending build context to Docker daemon  57.34kB
Step 1/6 : FROM python:3.6
 ---> 1ec4d11819ad
Step 2/6 : MAINTAINER ********** <**********@gmail.com>
 ---> Using cache
 ---> 8315c7cf81b1
Step 3/6 : WORKDIR /app
 ---> Using cache
 ---> f47a9880113a
Step 4/6 : RUN pip install bottle
 ---> Using cache
 ---> c8097f5b2525
Step 5/6 : COPY app.py /app
 ---> Using cache
 ---> d7d4dc91beb4
Step 6/6 : CMD python3 app.py
 ---> Using cache
 ---> 0bdadfdfacd3
Successfully built 0bdadfdfacd3
Successfully tagged registry.heroku.com/bottlescrapy/web:latest
=== Pushing web (/home/*******/Documents/source/python/bottlescrapy/Dockerfile)
The push refers to a repository [registry.heroku.com/bottlescrapy/web]
3951f89fb416: Pushed
b28bb0e035ec: Layer already exists
f7c51fdee3d3: Layer already exists
27951393f8e7: Layer already exists
f89067d6e30e: Layer already exists
5129f19da2c9: Layer already exists
34929ec591c4: Layer already exists
e02b32b1ff99: Layer already exists
f75e64f96dbc: Layer already exists
8f7ee6d76fd9: Layer already exists
c23711a84ad4: Layer already exists
90d1009ce6fe: Layer already exists
latest: digest: sha256:1ca5dcd5bc71d05714bffd233ee348d21e57ad2a72bb77c8c6e3e7bb829239b9 size: 2842
Your image has been successfully pushed. You can now release it with the 'container:release' command.
リリース
アプリケーションをリリースします。
$ sudo heroku container:release web
Releasing images web to bottlescrapy... done
起動確認
実際の画面を確認します。正しく動作できているようです。

所感
pythonのWebフレームワークであるbottleを使った簡単なアプリケーションを、Dockerコンテナにしてデプロイし、起動確認しました。割と簡単にできたと思います。